Build a pallet compost bin in an afternoon
Build a free pallet compost bin to save money and reduce household waste. Find safe materials and construct a three sided wood bin in an afternoon.
- Written and checked byHazel Pruett
- 7 minutes to read it all
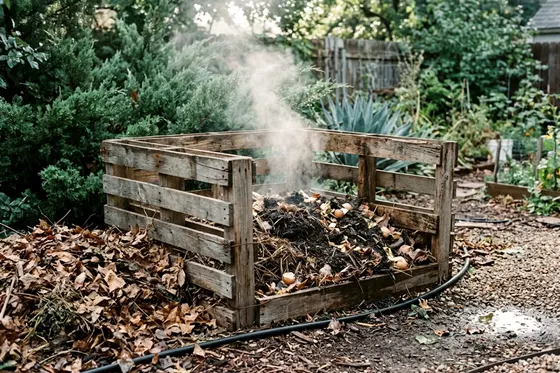
Building a compost bin from shipping pallets costs nothing for the wood and requires only basic hardware. You can finish the project in a single afternoon and start turning household waste into rich soil. A three sided pallet compost bin provides plenty of airflow to break down organic matter.
Choose pallets that are safe and untreated
Four wooden pallets form the strong outer walls and door of your new bin. Local hardware stores, garden centers and grocery shops often give away empty shipping pallets. Ask a store employee before you load any free pallets into your vehicle.
Search for standard grocery pallets that share the exact same dimensions. Matching sizes ensure your finished bin sits square on the bare ground.
Inspect every wooden pallet for safety stamps before you take it home. Look for a stamp on the thick side block and find out what it means before you take the pallet home. A pallet with no stamp or an unclear one is best left behind.
Leave behind any pallet whose stamp you cannot read. Ask the store manager how the pallets were treated if you cannot find a stamp.
Check the bare wood for chemical spills, dark stains and bad odors. Shipping pallets can carry spilled chemicals or oil. Leave any deeply stained wood behind at the garden center or hardware store.
Skip painted pallets as well, since the EPA says painted wood does not belong in a compost pile. Clean, dry wood provides a safe structural frame for your backyard compost system.
No reclaimed treated wood is guaranteed completely safe around edible garden crops. Check your local extension office guidance if you feel unsure about using old wood.
Inspect the narrow slats for broken boards, deep cracks and loose rusty nails. Solid wood blocks hold the heavy metal screws you need to build the frame.
Pick a level, well drained spot with a hose nearby
The EPA notes that a compost pile belongs near a reliable water source. You will need to wet the organic material during dry summer weeks. Pick a spot where your garden hose easily reaches the new bin. Pick a spot that drains well and is easy to reach all year.
Do not build your new bin directly against a wooden property fence. The damp organic material can rot your wooden fence boards over time. Leave some open space around the back and sides.
This open gap gives you room to work and protects your permanent fence. Both direct sun and deep shade work fine for a backyard compost pile. Pick a flat area and level the uneven ground with a steel shovel.
Dig out the grass and deep weeds to expose the bare soil beneath. Tamp the loose dirt down flat with the heavy soles of your work boots.
Set a long carpenter level across the bare dirt to check the grade. A level surface prevents the heavy wooden walls from leaning or falling over. Dig a shallow straight trench for the bottom edge of each heavy pallet.
Resting the wood slightly below ground level adds stability to the finished bin. Review the basic steps for starting a compost pile before you finalize the location.
Stand and fasten three pallets for the walls
Three wooden pallets form a rigid U-shape for the main compost structure. Stand the first heavy pallet upright inside the shallow dirt back trench. Have a helper hold this back wall steady while you position the sides.
Stand the second pallet at a right angle to form the left wall. Push the heavy inner wood blocks of both adjacent pallets tightly together.
Drive long exterior wood screws through the side pallet and into the back. Use a cordless drill and pre-drill pilot holes through the dry wood first. Old pallet wood splits easily when you drive thick metal screws into it.
Place one screw in the top block, one in the middle and one below. Stand the third pallet on the right side to form the final corner. Line up the wooden blocks and drive three more screws into the back wall.
The three sided structure will stand on its own once you fasten these corners. Check the top edge of the upright pallets with your long carpenter level.
Attach galvanized metal corner brackets to reinforce the simple wooden butt joints. Place a steel L-bracket inside the top corner where the two pallets meet. Drive short exterior wood screws through the metal bracket and into the blocks.
Secure a second matching steel bracket to the bottom inside wood corner. Repeat this metal bracket installation on the opposite side of the bin.
Strong corners keep the bin from twisting when you turn the heavy compost. The wide open front gives you plenty of room to load yard waste.
Add a hinged front so you can reach the pile
A fixed front wall makes a full compost bin very hard to empty. Add hinges to the fourth pallet so it swings outward like a gate. Stand the fourth wooden pallet across the open front of the new bin.
Leave a small gap next to the side wall so the wood swings freely. Attach two heavy-duty gate hinges to the solid blocks of the side wall.
Fasten the flat side of the heavy hinges to the front door pallet. Use thick lag screws to handle the weight of the swinging wood. Place a brick under the moving end of the door to stop it sagging.
Install a metal gate latch on the opposite corner of the wooden bin. Screw the latch bar to the door and the catch piece to the wall. A strong metal latch holds the door shut against the swelling compost inside.
Some gardeners cut the front pallet in half horizontally with a sharp hand saw. A half door covers the bottom of the pile but leaves the top open.
This setup lets you toss daily kitchen scraps over the wooden edge. You only open the bottom latch when you need to harvest the finished soil.
Close the gaps that let small animals in
Wooden pallets leave wide gaps between their top and bottom slat boards. These open spaces let hungry animals climb inside and eat your kitchen scraps. You need a tight physical barrier to keep local pests out of your compost.
The EPA states that a compost bin should have no holes or gaps larger than a quarter inch. You can follow this rule by lining the pallets with galvanized hardware cloth. The metal wire mesh blocks small animals while letting fresh air circulate freely.
Buy a roll of quarter-inch hardware cloth to cover the inner walls. Wear thick leather work gloves when you handle and cut the sharp metal mesh. Cut the cloth with tin snips to match the inside width of each wall.
Roll the cut mesh flat against the inside face of the rough wood boards. Staple the wire cloth to the pallet wood with a heavy-duty staple gun.
Drive a steel staple every few inches along the top, middle and bottom boards. Bend the wire tightly into the wooden corners so no hidden entry gaps remain.
Run the metal mesh all the way down into the loose dirt floor. Small backyard pests constantly look for low entry points near the ground level.
Layer browns and greens and turn the pile
Your finished pallet bin is completely ready to hold fresh raw materials. The EPA says to add at least two to three times the volume of browns as greens to a compost pile. Browns provide essential carbon, while wet greens deliver the nitrogen your pile needs.
Learn what counts as yard waste in your town before you sort your materials. Collect dry autumn leaves, fallen pine needles, small branches and plain shredded newspaper.
Gather wet grass clippings, daily vegetable peels and leftover coffee grounds for green materials. Spread a thick layer of coarse brown twigs on the bare dirt floor first. This loose base layer pulls fresh air into the bottom of the compost pile.
Add a thin layer of wet greens directly over the coarse twig base. Cover the greens with a layer of browns with two to three times the volume. Keep stacking these alternating wet and dry layers until you fill the pallet bin.
Water the pile with your garden hose until the material feels like a wrung-out sponge. The helpful bacteria and fungi need steady moisture to break down the tough fibers. A pile that is too dry breaks down more slowly.
Check the internal moisture level often and add water when the pile dries. Turn the pile from time to time to mix the decaying layers together.
Open the hinged front door and drive a sturdy pitchfork deep into the material. Move the dry outside edges into the hot, damp center of the bin. Turning the pile adds fresh oxygen and breaks up matted clumps of wet leaves. Close and securely latch the front door when you finish mixing the compost materials.
More to check around the house
How to start a compost pile in your backyard
Start a backyard compost pile to turn kitchen scraps into a free soil amendment, reduce household trash and save money on bagged garden soil.
7 minutes to read it all
What bokashi composting can handle that a pile cannot
Learn how bokashi composting handles meat and dairy using oxygen free fermentation and turns household food waste into rich garden soil in just a few weeks.
6 minutes to read it all
7 steps to turn a horse manure pile into garden compost
Build a horse manure compost pile to process stable waste into rich soil. Learn the right temperatures, sizes and turning schedules for garden ready compost.
6 minutes to read it all